Yoga Starter 1

Yogasana Basic Knowledge
June 8, 2016Yoga Starter 2
June 9, 2016
Full Butterfly Poorna Titali Asana 11
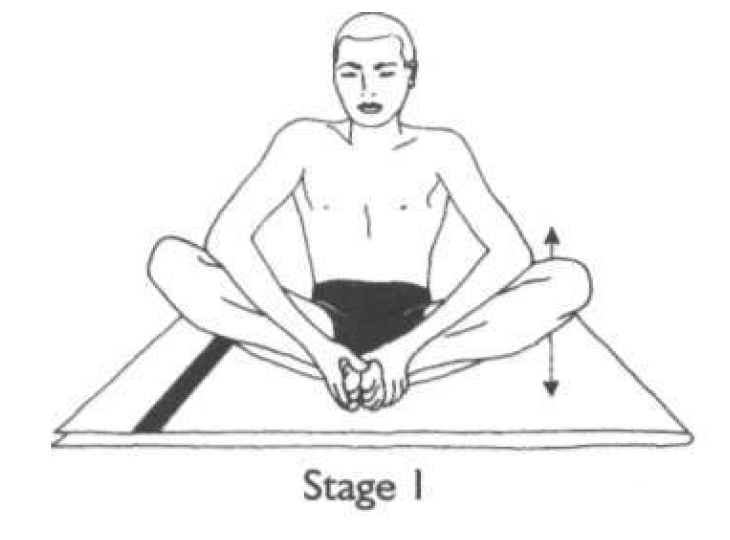
Practice 11:
Poorna Titali Asana (full butterfly)
Sit in the base position.
Bend the knees and bring the soles of the feet together, keeping the heels as close to the body as possible.
Fully relax the inner thigh muscles.
Stage I:
Clasp the feet with both hands.
Gently bounce the knees up and down, using the elbows as levers to press the legs down.
Try to touch the knees to the ground on the downward stroke.
Do not use any force.
Practise 30 to 50 up and down movements.
Stage 2:

Keep the soles of the feet together.
Place the hands on the knees.
Using the palms, gently push the knees down towards the floor, allowing them to spring up again.
Do not force this movement.
Repeat 20 to 30 times.
Straighten the legs and relax.
Breathing: Normal breathing, unrelated to the practice.
Awareness: On mental counting, movement and relaxation.
Contra-indications: People with sciatica and sacral conditions should avoid this asana.
Benefits:
Both stages prepare the legs for mastery of padmasana and other meditative asanas. The inner thigh muscles hold a lot of tension which is relieved by these asanas.
They also remove tiredness from long hours of standing and walking.
Base Position Prarambhik Sthiti 1
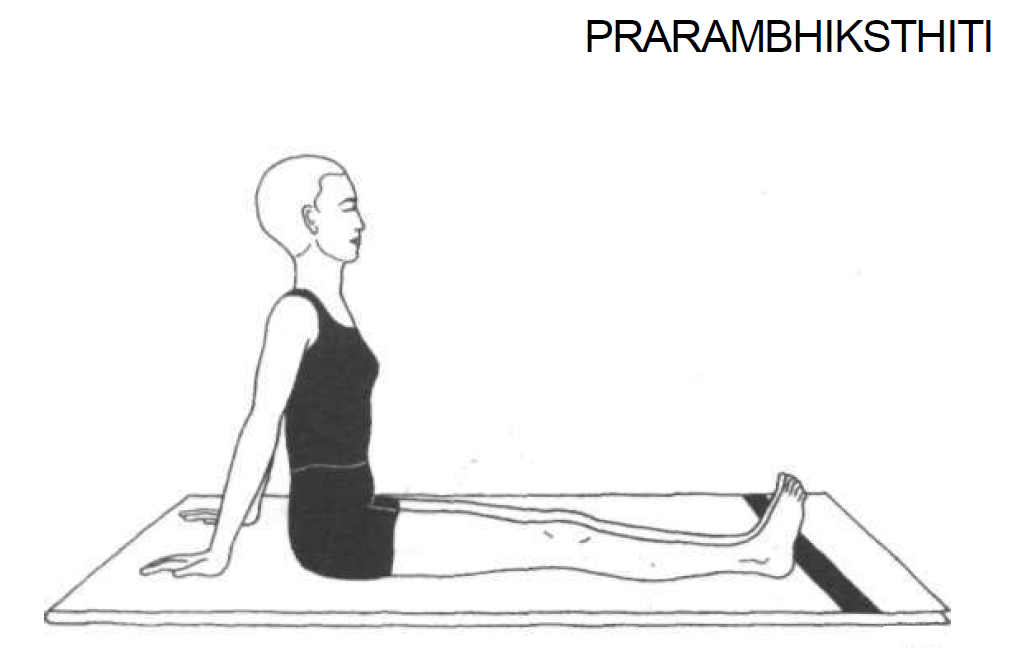
Prarambhik Sthiti (base position)
Sit with the legs outstretched.
Place the palms of the hands on the floor to the sides and just behind the buttocks.
The back, neck and head should be straight.
Straighten the elbows.
Lean back slightly, taking the support of the arms.
Close the eyes and relax the whole body in this position.
Toe & Ankle Bending Padanguli & Goolf Naman 2
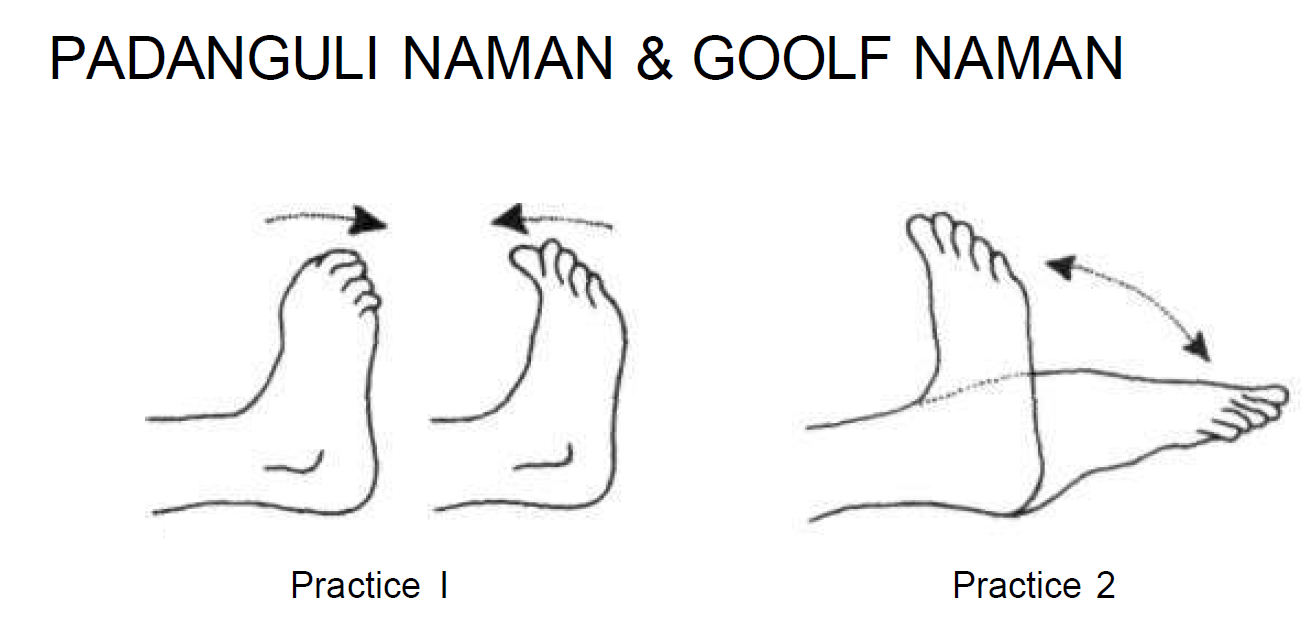
Practice I: Padanguli Naman (toe bending)
Sit in the base position with the legs outstretched and the feet slightly apart. Place the hands beside and slightly behind the buttocks.
Lean back a little, using the arms to support the back.
Keep the spine as straight as possible.
Be aware of the toes. Move the toes of both feet slowly backward and forward, keeping the feet upright and the ankles relaxed and motionless.
Hold each position for a few seconds.
Repeat 10 times.
Breathing: Inhale as the toes move backward.
Exhale as the toes move forward.
Awareness: On the breath, mental counting and the stretching sensation produced by the movement.
Practice 2: Goolf Naman (ankle bending)
Remain in the base position. Keep the feet slightly apart.
Slowly move both feet backward and forward, bending them from the ankle joints. Try to stretch the feet forward to touch the floor and then draw them back towards the knees.
Hold each position for a few seconds.
Repeat 10 times.
Breathing: Inhale as the feet move backward.
Exhale as the feet move forward.
Awareness: On the breath, mental counting and the stretch in the foot, ankle, calf and leg muscles or joints.
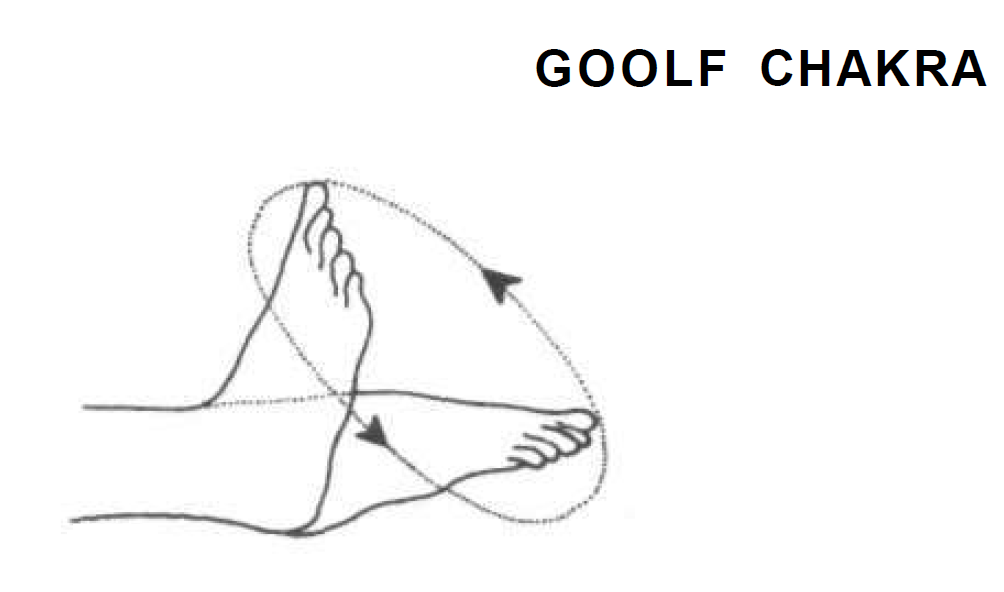
Ankle Rotation Goolf Chakra 3
Practice 3:
Goolf Chakra (ankle rotation)
Remain in the base position.
Separate the legs a little, keeping them straight.
Keep the heels on the ground throughout the practice.
Stage I:
Slowly rotate the right foot clockwise from the ankle 10 times and then repeat 10 times anti-clockwise.
Repeat the same procedure with the left foot.
Stage 2:
Place the feet together.
Slowly rotate both feet together in the same direction, keeping them in contact with each other.
Do not allow the knees to move.
Practise 10 times clockwise and then 10 times anticlockwise.
Stage 3:
Keep the feet separated.
Keep the feet separated.
Slowly rotate both feet from the ankles together but in opposite directions.
The big toes should touch each other on the inward stroke of each foot.
Do 10 rotations in one direction and then 10 rotations in the opposite direction.
Breathing: Inhale on the upward movement.
Exhale on the downward movement.
Awareness: On the breath, mental counting and rotation.
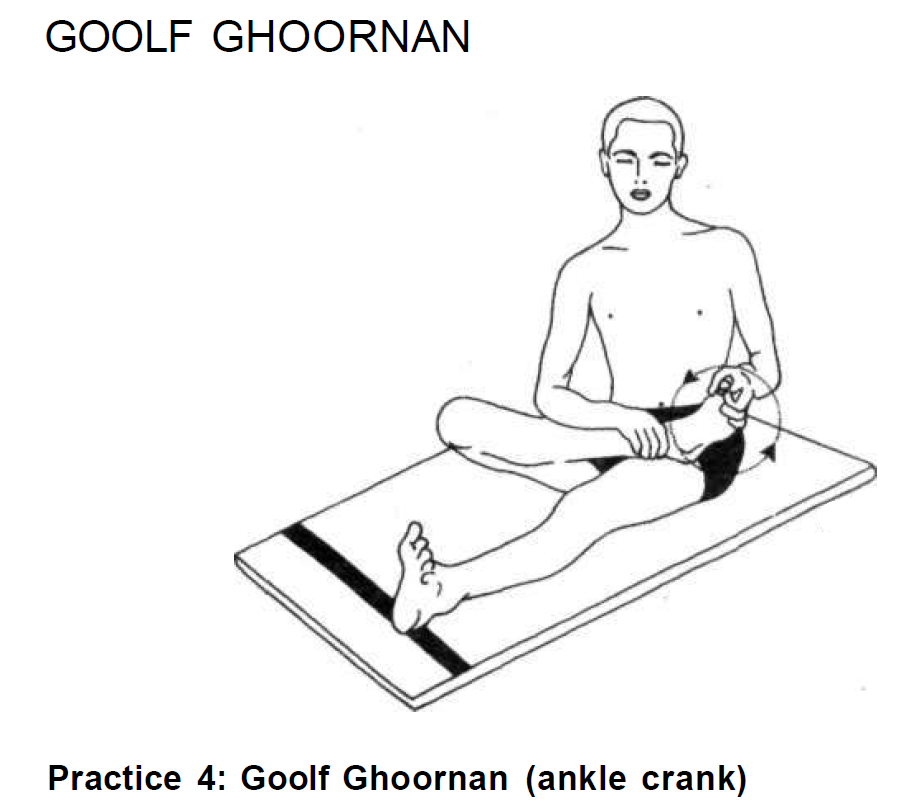
Ankle Crank Goolf Ghoornan 4
Practice 4:
Goolf Ghoornan (ankle crank)
Remain in the base position.
Bend the right knee and bring the foot towards the buttock.
Turn the knee out to the side and place the foot on the left thigh.
Make sure the ankle is far enough over the thigh to be free for rotation.
Hold the right ankle with the right hand to support the ankle.
Hold the toes of the right foot with the left hand.
With the aid of the left hand, slowly rotate the right foot 10 times clockwise, then 10 times anti-clockwise.
Repeat with the left foot placed on the right thigh.
Breathing: Inhale on the upward movement.
Exhale on the downward movement.
Awareness: On the breath, mental counting and rotation.
Benefits:
All the foot and calf asanas help in returning the stagnant lymph and venous blood. They thus relieve
tiredness and cramp and prevent venous thrombosis especially in bedridden, post-operative patients.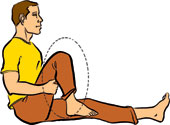
Kneecap Contraction Janufalak Akarshan 5
Practice 5:
Janufalak Akarshan (kneecap contraction)
Stay in the base position.
Contract the muscle surrounding the right knee, drawing the kneecap back towards the thigh.
Hold the contraction for 3 to 5 seconds, counting mentally.
Release the contraction and let the kneecap return to its normal position.
Practice 5 times.
Repeat with the left kneecap 5 times, then with both kneecaps together.
Breathing: Inhale while contracting.
Hold the breath during contraction.
Exhale while relaxing the knee muscles.
Awareness: On the breath, mental counting and contraction.
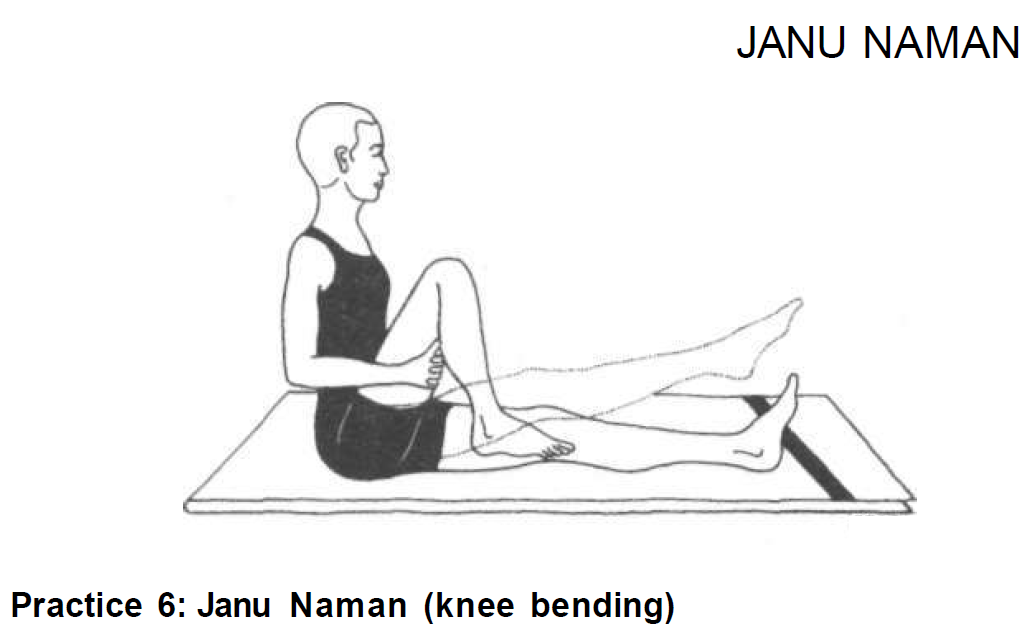
Knee Bending Janu Naman 6
Practice 6:
Janu Naman (knee bending)
Stay in the base position. Bend the right knee and clasp the hands under the right thigh.
Straighten the right leg, pulling up the kneecap.
Keep the hands under the thigh but straighten the arms.
Do not allow the heel or toes to touch the floor.
Bend the right leg at the knee so that the thigh comes close to the chest and the heel near the buttocks.
Keep the head and spine straight.This is one round.
Practise 10 rounds with the right leg and then 10 rounds with the left leg.
Breathing: Inhale while straightening the leg.
Exhale while bending the leg.
Awareness: On the breath, mental counting, stretch in the thigh muscles and synchronised movement.
Practice note:
While bending the knee the hands may also clasp the lower shin. The thigh is then pressed against the
abdomen helping to release air from this area.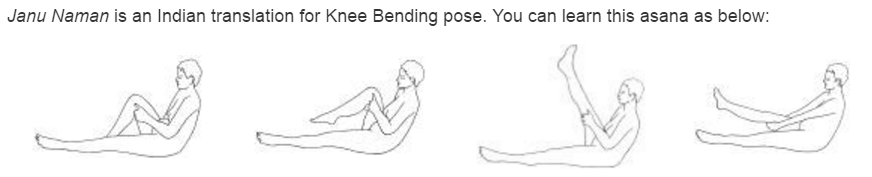
Double Knee Bending Dwi Janu Naman 7
Practice 7:
Dwi Janu Naman (double knee bending)
Sitting in the base position, place both palms flat on the floor at the side and slightly in front of the buttocks.
Bend both knees together, and place the feet on the floor in front of the buttocks.
Straighten the legs and raise the feet so that they are about 8 cm above the floor in the final position.
Point the toes forward.The hands and arms should support and maintain stability of the body. Try to keep the head and spine upright.
Remain in the position for a second.
Bend the knees and bring the legs back to the starting position, keeping the heels slightly above the floor.
Draw the toes back towards the shins.
This is one round.
Practice 5 to 10 rounds, keeping the heels off the floor throughout the practice.
Breathing: Inhale while straightening the legs.
Exhale while bending the legs.
Awareness: On the breath, mental counting, movement and balance.
Contra-indications:
This is a strenuous practice and should not be attempted by people with weak abdominal muscles, back conditions, high blood pressure or heart conditions.
Practice note: The hands may also be clasped under the thighs as in janu naman. This is a good preparatory asana for brahmachary asana.
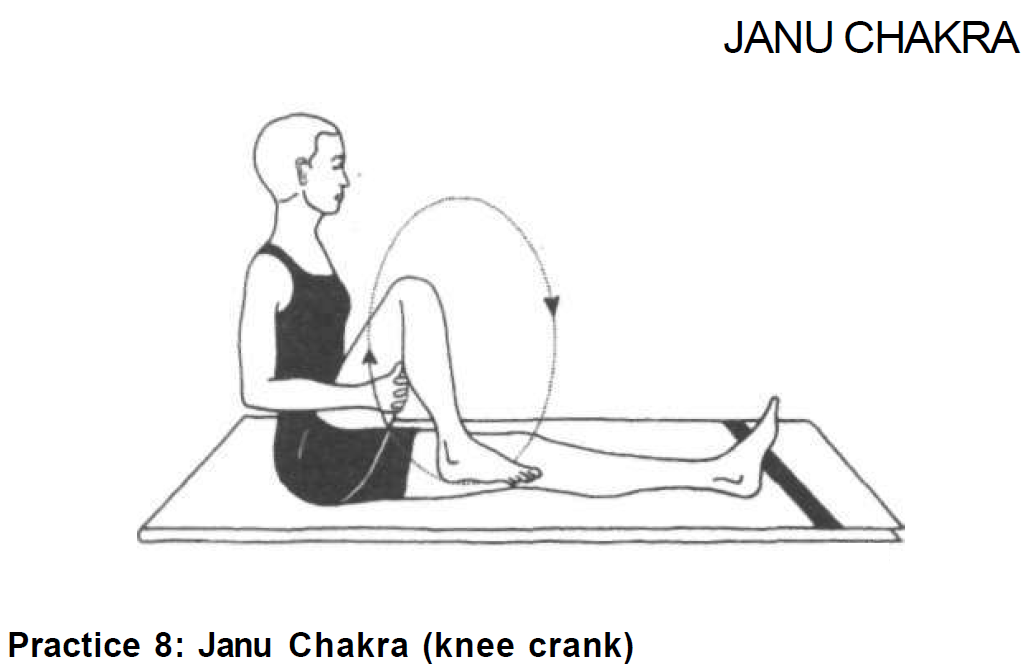
Knee Crank Janu Chakra 8
Practice 8:
Janu Chakra (knee crank)
Sit in the base position.
Bend the right leg at the knee as described in practice 6.
Place the hands under the right thigh and interlock the fingers or cross the arms holding the elbows.
Raise the right foot from the ground.
Rotate the lower leg from the knee in a large circular movement; try to straighten the leg at the top of the
upward movement.The upper leg and trunk should be completely still.
Rotate 10 times clockwise and then 10 times anti-clockwise.
Repeat with the left leg.
Breathing: Inhale on the upward movement.
Exhale on the downward movement.
Awareness: On the breath, mental counting, movement and perfection of circular rotation.
Benefits:
Since the knee joint bears the whole weight of the body and has no strong muscles for support, it is most
vulnerable to injuries, sprains and osteoarthritis. All the knee asanas strengthen the quadriceps muscle and the ligaments around the knee joint. These asanas rejuvenate the joint by activating the healing energies.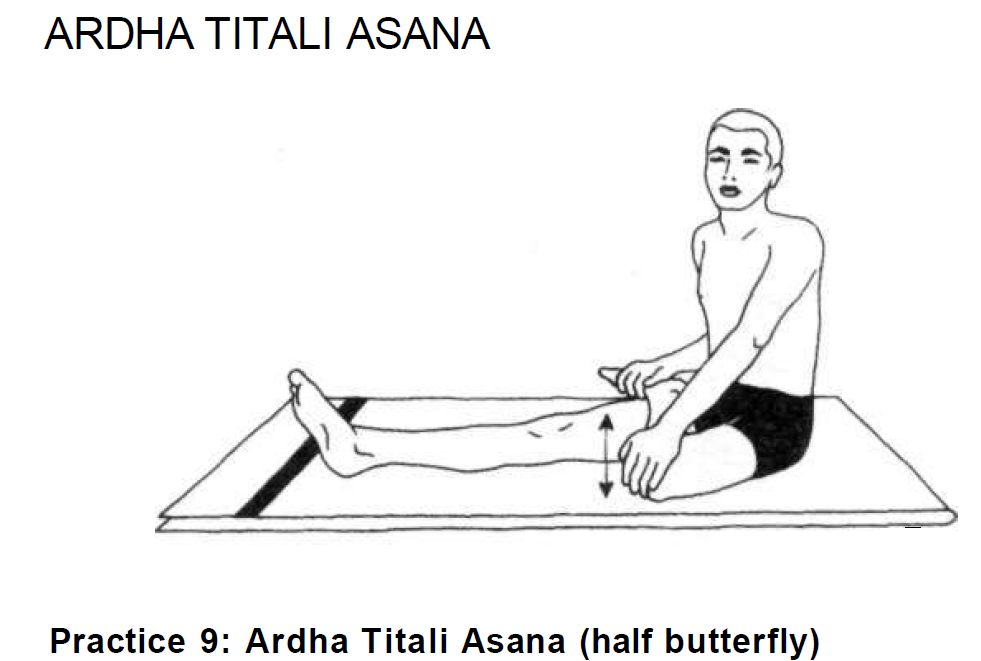
Half Butterfly Ardha Titali Asana 9
Practice 9:
Ardha Titali Asana (half butterfly)
Sit in the base position.
Bend the right leg and place the right foot as far up on the left thigh as possible.
Place the right hand on top of the bent right knee.
Hold the toes of the right foot with the left hand.
This is the starting position.
Stage I: with breath synchronisation
While breathing in, gently move the right knee up towards the chest. Breathing out, gently push the knee down and try to touch the knee to the floor.
The trunk should not move.
Do not force this movement in any way.
The leg muscles should be passive, the movement being achieved by the exertion of the right arm.
Slowly practise 10 up and down movements.
Awareness: On the breath, mental counting, movement of hip joint and relaxation of inner thigh muscles.
Stage 2: without breath synchronisation
Remain in the same position with the right leg on the left thigh.
Relax the right leg muscles as much as possible.
Push the right knee down with the right hand and try to touch the knee to the floor.
Do not strain.
Let the knee spring up by itself.
The movement is achieved by use of the right arm only.
Practise 30 up and down movements in quick succession.
Breathing should be normal and unrelated to the practice.
Repeat stages 1 and 2 and the unlocking procedure (see note below) with the left leg.
Awareness:
On mental counting, movement of hip joint and relaxation of inner thigh muscles.
Benefits:
This is an excellent preparatory practice for loosening up the knee and hip joints for meditative poses.
Those people who cannot sit comfortably in cross-legged positions should practise ardha titali asana daily, both morning and evening.
Practice note:
To unlock the leg after completing stage 2, slowly and carefully straighten the leg.
Bend it once, bringing the heel near the buttock.
Straighten the leg.
This procedure will ensure that the knee joint is realigned correctly.
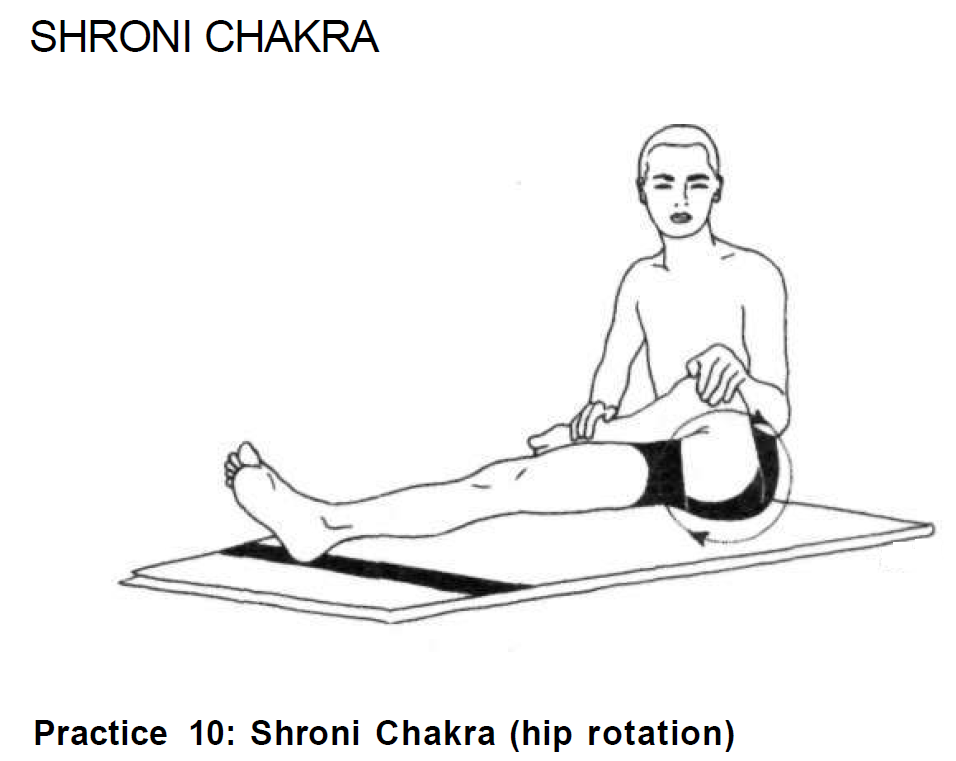
Hip Rotation Shroni Chakra 10
Practice 10:
Shroni Chakra (hip rotation)
Sit in the same starting position as for asana 9 with the right leg on the left thigh.
Using the muscles of the right arm, rotate the right knee in a circle trying to make the circular movement as large as possible.
The index finger may be pointed out and used as a guide to perfection of the circular movement.
Practise 10 rotations clockwise and then 10 rotations anticlockwise.
Straighten the leg slowly.
Release the knee as described in the note to asana 9.
Repeat with the left leg.
Breathing: Inhale on the upward movement.
Exhale on the downward movement.
Awareness: On the breathing, mental counting and rotation of the hip joint.
Hand Clenching Mushtika Bandhana 12
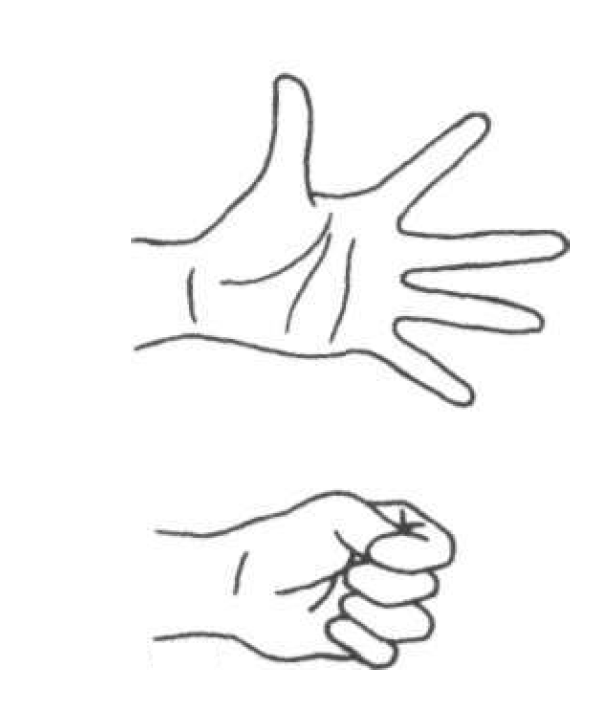
Practice 12:
Mushtika Bandhana (hand clenching)
Sit in the base position or a cross-legged pose.
Hold both arms straight in front of the body at shoulder level.
Open the hands, palms down, and stretch the fingers as wide apart as possible.
Close the fingers to make a tight fist with the thumbs inside.
The fingers should be slowly wrapped around the thumbs.
Again open the hands and stretch the fingers.
Repeat 10 times.
Breathing: Inhale on opening the hands.Exhale on closing the hands.
Awareness: On the breath, mental counting, stretching sensation and movement.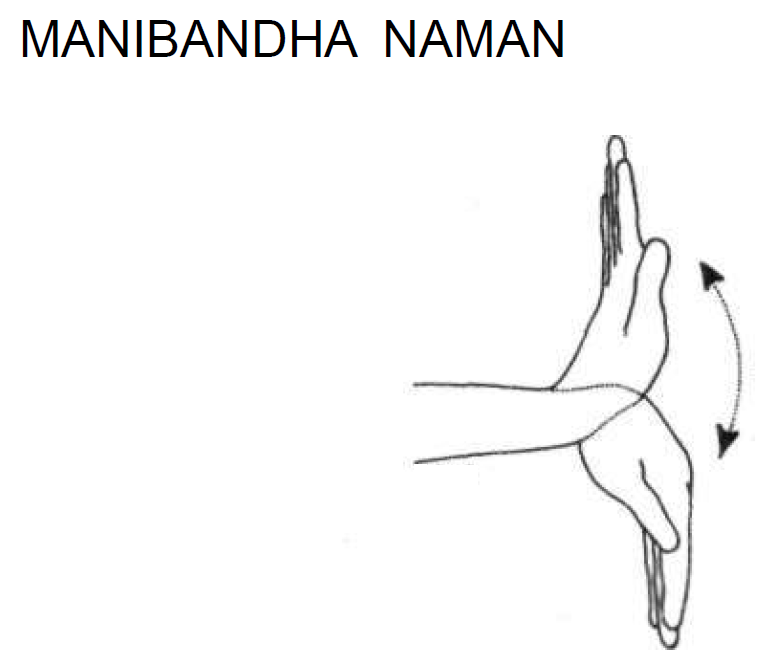
Wrist Bending Manibandha Naman 13
Practice 13:
Manibandha Naman (wrist bending)
Remain in the base position or a cross-legged pose.
Stretch the arms in front of the body at shoulder level.
Keep the palms open and fingers straight throughout the entire practice.
Bend the hands backward from the wrists as if pressing the palms against a wall with the fingers pointing toward the ceiling.
Bend the hands forward from the wrists so that the fingers point toward the floor.
Keep the elbows straight throughout the practice.
Do not bend the knuckle joints or fingers.
Bend the hands up again for the next round.
Repeat 10 times.
Breathing: Inhale with the backward movement.
Exhale with the forward movement.
Awareness:
On the breath, mental counting, movement in the wrist joint and stretching of the forearm muscles.
Wrist Joint Rotation Manibandha Chakra 14
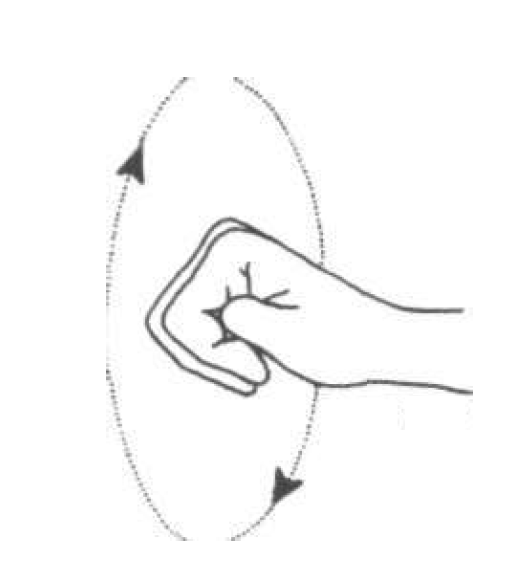
Practice 14:
Manibandha Chakra (wrist joint rotation)
Remain in the base position or a comfortable cross-legged pose, but keep the back straight.
Stage I:
Extend the right arm forward at shoulder level.
Make a fist with the right hand, with the thumb inside.
The left hand may be used as a support if necessary.
This is the starting position.
Slowly rotate the fist about the wrist, ensuring that the palm faces downward throughout the rotation.
The arms and elbows should remain perfectly straight and still. Make as large a circle as possible.
Practice 10 times clockwise and 10 times anti-clockwise.
Repeat the same with the left fist.
Stage 2:
Extend both arms in front of the body with the fists clenched.
Keep the arms straight and at shoulder level.
Rotate the fists together in the same direction.
Practice 10 times in each direction.
Stage 3:Practice as in stage 2.
Rotate the fists together in the opposite direction.
Practice 10 times in each direction.
Benefits:
The hand and wrist asanas are beneficial for arthritis of the related joints. They also relieve tension caused by prolonged writing, typing and so on.
Elbow Bending Kehuni Naman 15
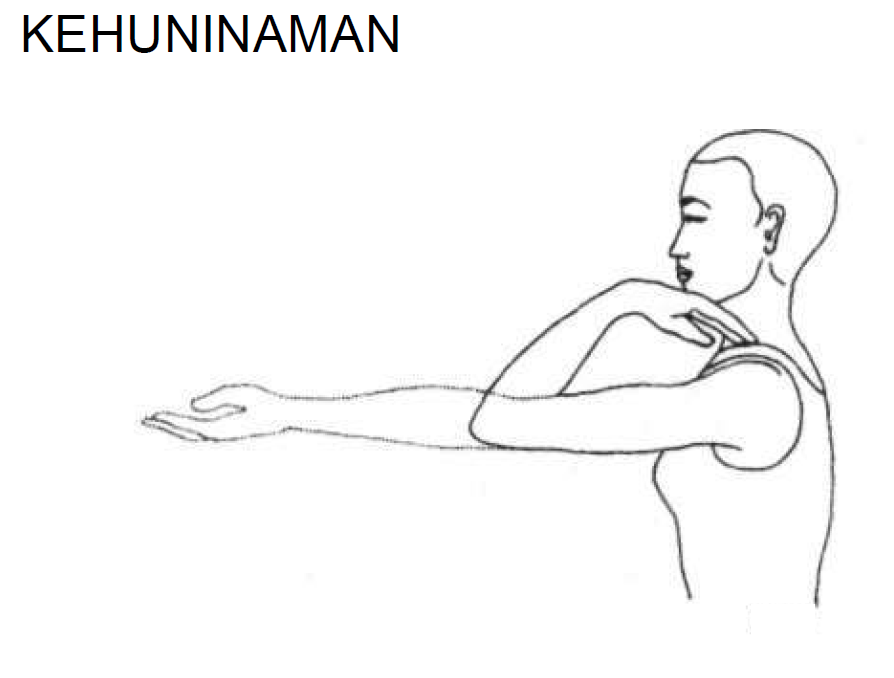
Practice 15:
Kehuni Naman (elbow bending)
Stage I:Remain in the base position or a cross-legged pose.
Stretch the arms in front of the body at shoulder level.
The hands should be open with the palms facing up.
Bend the arms at the elbows and touch the fingers to the shoulders.
Straighten the arms again.
This is one round.
Repeat 10 times.
Stage 2:
Extend the arms sideways at shoulder level, hands open and palms facing the ceiling.
Bend the arms at the elbows and touch the fingers to the shoulders.
Again straighten the arms sideways.
Repeat 10 times.
Breathing: Inhale while straightening the arms.
Exhale while bending the arms.Awareness: On the breathing, the mental counting and the movement.
Practice note:
Throughout both stages, the upper arms remain parallel to the floor, elbows at shoulder level.
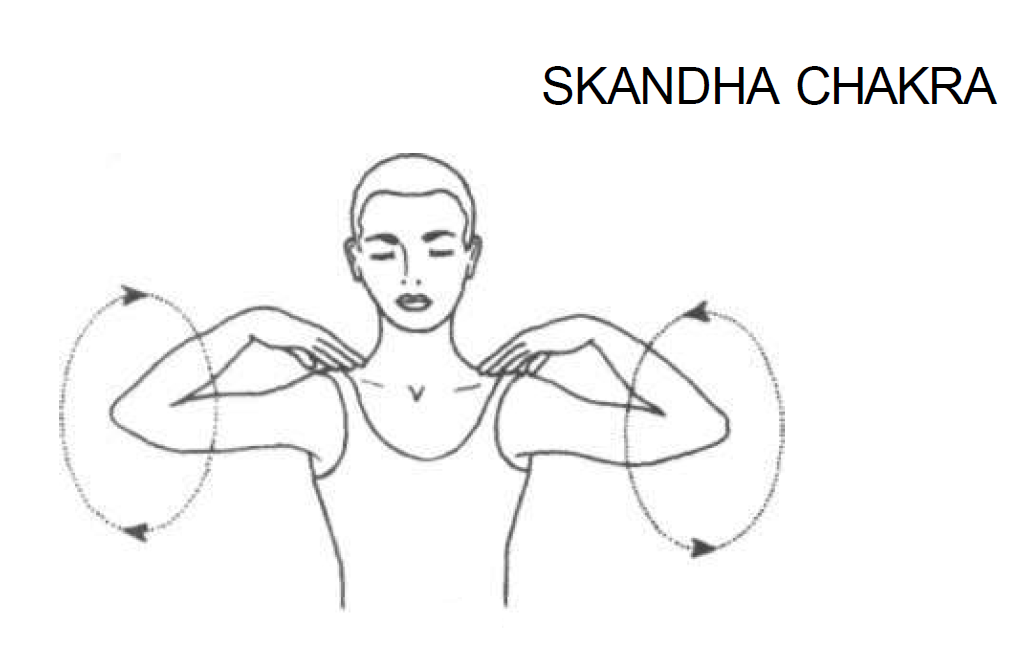
Shoulder Socket Rotation Skandha Chakra 16
Practice 16:
Skandha Chakra (shoulder socket rotation)
Stage I:
Remain in the base position or a cross-legged pose.
Place the fingers of the right hand on the right shoulder.
Keep the left hand on the left knee and the back straight.
Rotate the right elbow in a large circle.
Practice 10 times clockwise and 10 times anti-clockwise.
Repeat with the left elbow.
Make sure that the head, trunk and spine remain straight and still.
Stage 2:
Place the fingers of the left hand on the left shoulder
Place the fingers of the left hand on the left shoulder and the fingers of the right hand on the right shoulder.
Fully rotate both elbows at the same time in a large circle.
Try to touch the elbows in front of the chest on the forward movement and touch the ears while moving up.
Stretch the arms back in the backward movement and touch the sides of the trunk while coming down.
Practise slowly 10 times clockwise and then 10 times anticlockwise.
Breathing: Inhale on the upward stroke.
Exhale on the downward stroke.
Awareness:
On the breath, mental counting and the stretching sensation around the shoulder joint.
Benefits:
The shoulder asanas relieve the strain of driving and office work and are helpful in cervical spondylitis and frozen shoulder. They also maintain the shape of the shoulders and chest.
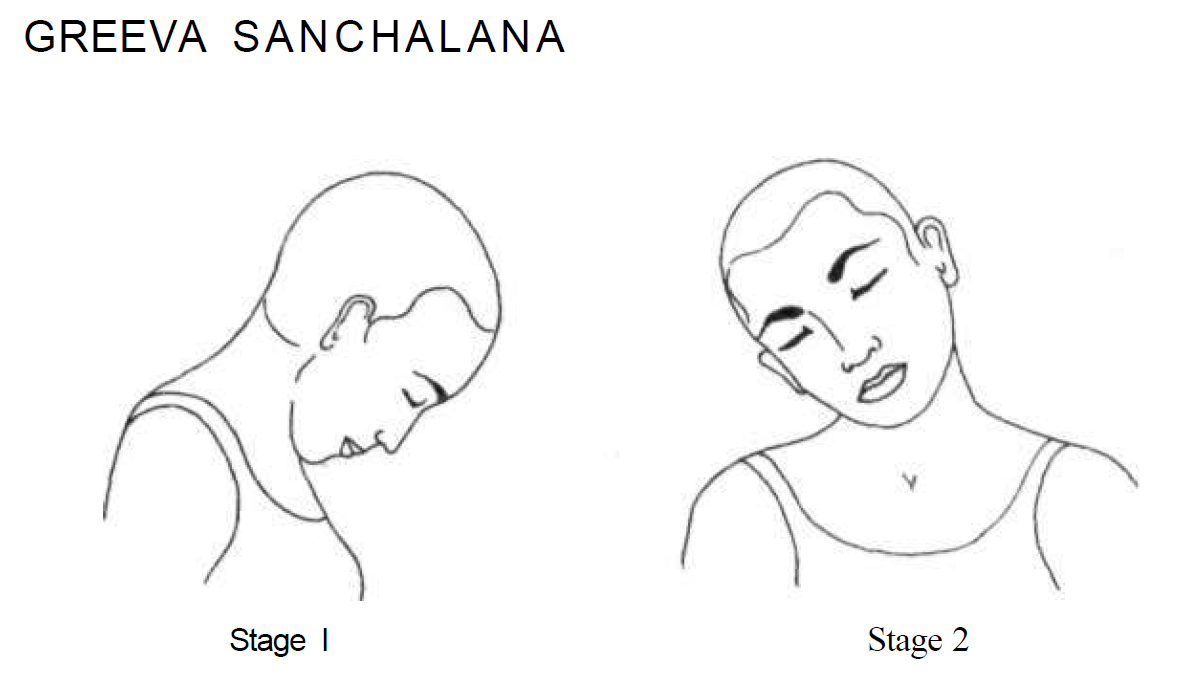
Neck Movements Greeva Sanchalana 17
Practice 17:
Greeva Sanchalana (neck movements)
Stage I:
Sit in the base position or a cross-legged pose with the hands resting on the knees in jnana or chin mudra.
Close the eyes.
Slowly move the head forward and try to touch the chin to the chest.
Move the head as far back as comfortable. Do not strain.
Try to feel the stretch of the muscles in the front and back of the neck, and the loosening of the vertebrae in the neck.
Practice 10 times.
Breathing: Inhale on the backward movement.
Exhale on the forward movement.Stage 2:
Remain in the same position, keeping the eyes closed.
Face directly forward.
Relax the shoulders.
Slowly move the head to the right and try to touch the right ear to the right shoulder without turning the head or raising the shoulders.
Move the head to the left side and try to touch the left ear to the left shoulder.
This is one round.
Do not strain; touching the shoulder is not necessary.
Practice 10 rounds.
Breathing: Inhale on the upward movement.
Exhale on the downward movement.Awareness:
On the breath, counting, and the stretching sensation of the muscles in the sides of the neck.
Stage 3:
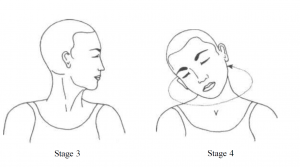
Stage 3: Remain in the base position.
Keep the head upright and the eyes closed.
Gently turn the head to the right so that the chin is in line with the shoulder.
Feel the release of tension in the neck muscles and the loosening of the neck joints.
Slowly turn the head to the left as far as is comfortable.
Do not strain.
Practice 10 times on each side.
Breathing: Inhale while turning to the front.
Exhale while turning to the side.Stage 4:
Remain in the same position with the eyes closed.
Slowly rotate the head downward, to the right, backward and then to the left side in a relaxed, smooth, rhythmic, circular movement.
Feel the shifting stretch around the neck and the loosening up of the joints and muscles of the neck.
Practice 10 times clockwise and then 10 times anticlockwise.
Do not strain.
If dizziness occurs, open the eyes. After the practice, keep the neck straight and the eyes closed. Be aware of the sensations in the head and neck.
Breathing: Inhale as the head moves up.
Exhale as the head moves down.Awareness: On the breath, mental counting and movement.
Contra-indications:
These four neck movements should not be performed by elderly people and those suffering from
low blood pressure, very high blood pressure or extreme cervical spondylosis. The advice of an expert should be sought for any of these problems. Patients of cervical spondylosis should strictly avoid forward bending of the neck.Benefits: All the nerves connecting the different organs and
All the nerves connecting the different organs and limbs of the body pass through the neck. Therefore, the muscles of the neck and shoulders accumulate tension, especially after prolonged work at a desk. These asanas
These asanas release tension, heaviness and stiffness in the head, neck and shoulder region.


It is very useful preparatory practice as it opens up all the major joints and relaxes the muscles of the body, to be practiced, by anyone: beginner or advanced, young or elderly, and by those convalescing or with disease conditions. These starting practices are simple, gentle and comfortable and in Sanskrit these practices are referred to as sukshma vyayama which means ‘subtle exercise’.
These yoga starters remove any blockages which prevent the free flow of energy in the body and mind. Sometimes, due to bad posture, disturbed bodily functions, psychological or emotional problems or an imbalanced lifestyle, the energy becomes blocked. This initially results in stiffness, muscular tension, lack of proper blood flow and minor functional defects. However, if these blockages become chronic, a limb, joint or physical organ may malfunction, fail or become diseased. Regular practice of these yoga starter removes energy blockages from the body and prevents new ones from forming. In this way, it promotes total health, regulating and stabilising the flow of energy throughout the body.
Mind-body aspect:-
Most modern day diseases are psychosomatic in nature. Drug treatment of these ailments is only symptomatic and fails to touch the roots of the disease. These asanas, if done correctly, in a non-competitive and relaxed atmosphere, not only relax the muscles of the body but these relaxing impulses travel back to the brain and relax the mind. By integrating the breath synchronisation and awareness, the attentive faculty of the mind is made active and is not allowed to wander into tension and stress. The nature of these asanas is thus more mental than physical. If they are performed correctly they relax the mind, tune up the autonomic nerves, hormonal functions and the activities of internal organs. Therefore, these asanas are of great preventative and curative value.