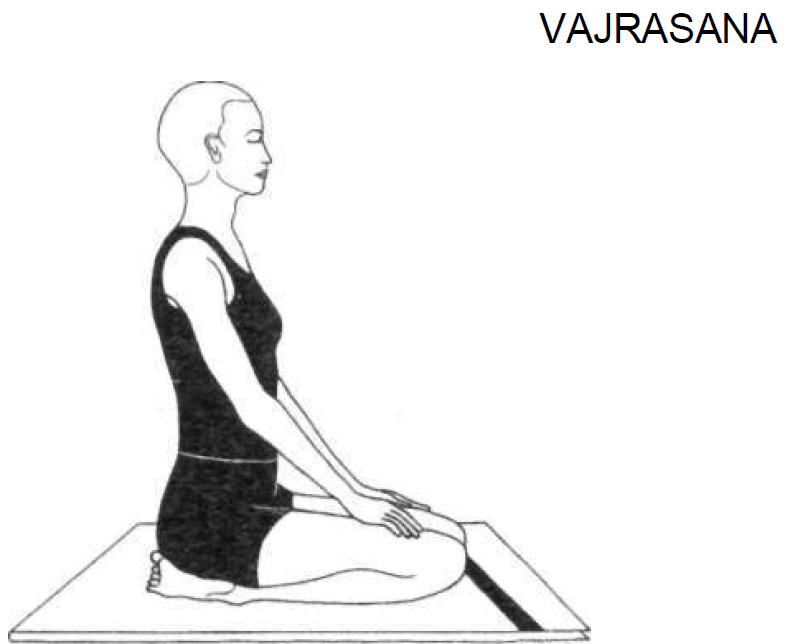
Yoga Starter 3

Yoga Starter 2
June 9, 2016
Yoga Exercises for the Eyes
June 9, 2016

Pulling the Rope Rajju Karshanasana 1
Practice I:
Rajju Karshanasana (pulling the rope)
Sit on the floor with the legs straight and together.
Keep the eyes open.
Imagine that there is a rope hanging in front of the body.
Breathe in while reaching up with the right hand as though to grasp the rope at a higher point.
Keep the elbow straight.
Look upward.
While breathing out, slowly pull the right arm down, putting power into it as though pulling the rope downwards.
Let the eyes follow the downward movement of the hand.
Repeat with the left hand and arm to complete the first round.
Both arms do not move at the same time.
Practice 5 to 10 rounds.
Breathing: Inhale while raising the arm.
Exhale while lowering the arm.Awareness: On the breath, movement and stretch of the upper back and shoulder muscles.
Benefits: This asana loosens the shoulder joints and stretches the upper back muscles. It firms the breast and develops the muscles of the chest.
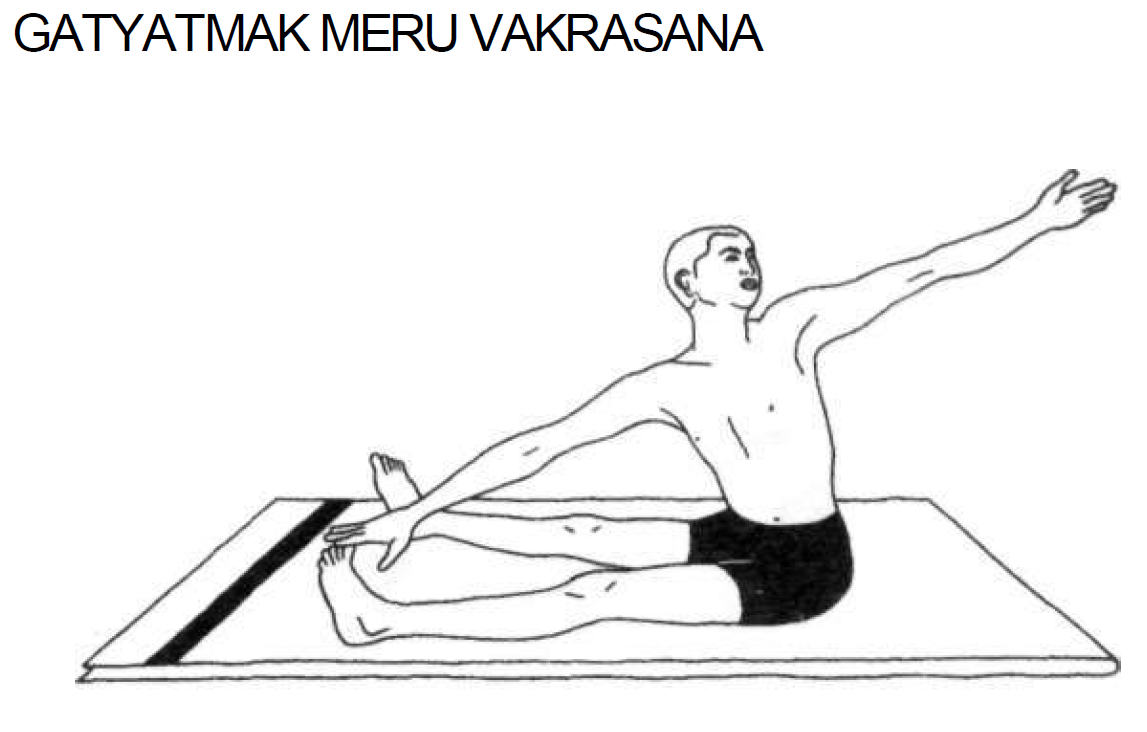
Dynamic Spinal Twist Gatyatmak Meru Vakrasana 2
Practice 2:
Gatyatmak Meru Vakrasana (dynamic spinal twist)
Sit on the floor with both legs outstretched.
Separate the legs as far apart as possible.
Do not allow the knees to bend.
Stretch the arms sideways at shoulder level.
Keeping the arms straight, twist to the left and bring the right hand down towards the left big toe.
Stretch the straight left arm behind the back as the trunk twists to the left.Keep both arms in one straight line.
Turn the head to the left and gaze at the left outstretched hand.
Twist in the opposite direction and bring the left hand down towards the right big toe.
Stretch the straight right arm behind the back. Turn the head to the right and gaze at the right outstretched hand.
This is one round.
Practice 10 to 20 rounds.
Start slowly and then gradually increase the speed.
Breathing:
To apply pressure in the abdomen: breathe in when twisting and breathe out when returning to the centre.
To give maximum flexion of the spine: breathe out when twisting and breathe in when returning to the centre.Awareness:
On the breath, the twisting movement and the effect on the spinal vertebrae and muscles.
Contra-indications:
People with back conditions should avoid this asana.
Benefits:
This asana loosens up the vertebrae and removes stiffness of the back.
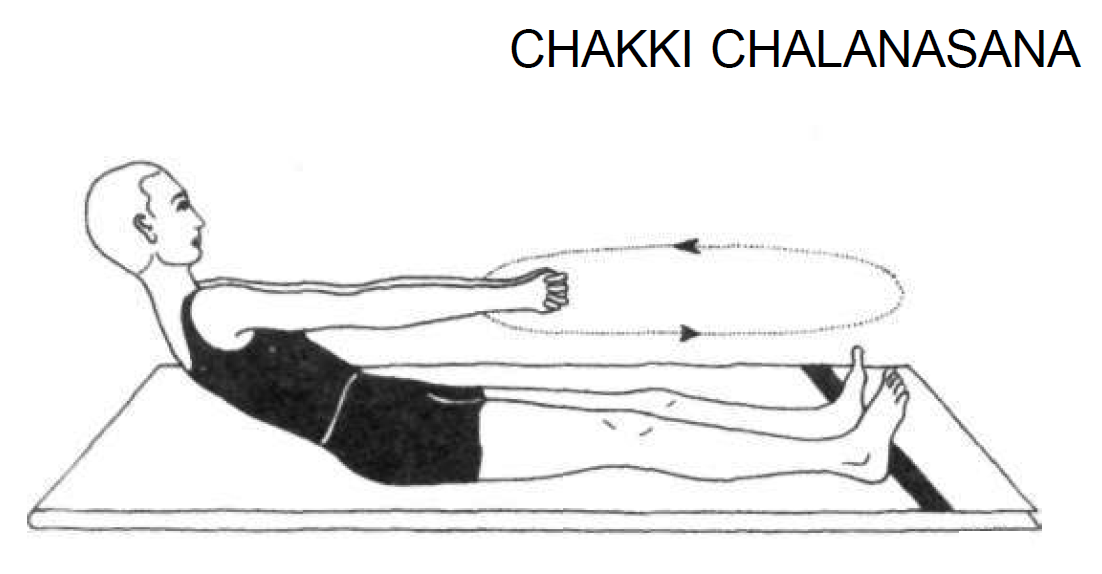
Churning the Mill Chakki Chalanasana 3
Practice 3:
Chakki Chalanasana (churning the mill)
Stage I:
Sit with the legs stretched out in front of the body
Sit with the legs stretched out in front of the body about one foot apart. Interlock the fingers of both hands and hold the arms out straight in front of the chest.
Keep the arms straight and horizontal throughout the practice; do not bend the elbows.
Bend forward as far as possible. Imagine the action of churning a mill with an old-fashioned stone grinder.
Swivel to the right so that the hands pass above the right toes and as far to the right as possible.
Lean back as far as possible on the backward swing.
Try to move the body from the waist. On the forward swing, bring the arms and hands to the left side, over the left toes and then back to the centre position.
One rotation is one round.
Practice 5 to 10 rounds clockwise and then the same number of rounds anti-clockwise.
Stage 2:
In the same sitting position, separate the legs as wide as possible, keeping them straight. Make large, circular movements over both feet, again trying to take the hands over the toes on the forward swing and coming as far back as possible on the backward swing.
Practice 10 times in each direction.
Breathing: Inhale while leaning back.
Exhale while moving forward.Awareness: On the breath, movement and lower back, hips and pelvic area.
Benefits:
This asana is excellent for toning the nerves and organs of the pelvis and abdomen. It is very useful for
regulating the menstrual cycle and may be performed during the first three months of pregnancy. It is also an excellent exercise for postnatal recovery.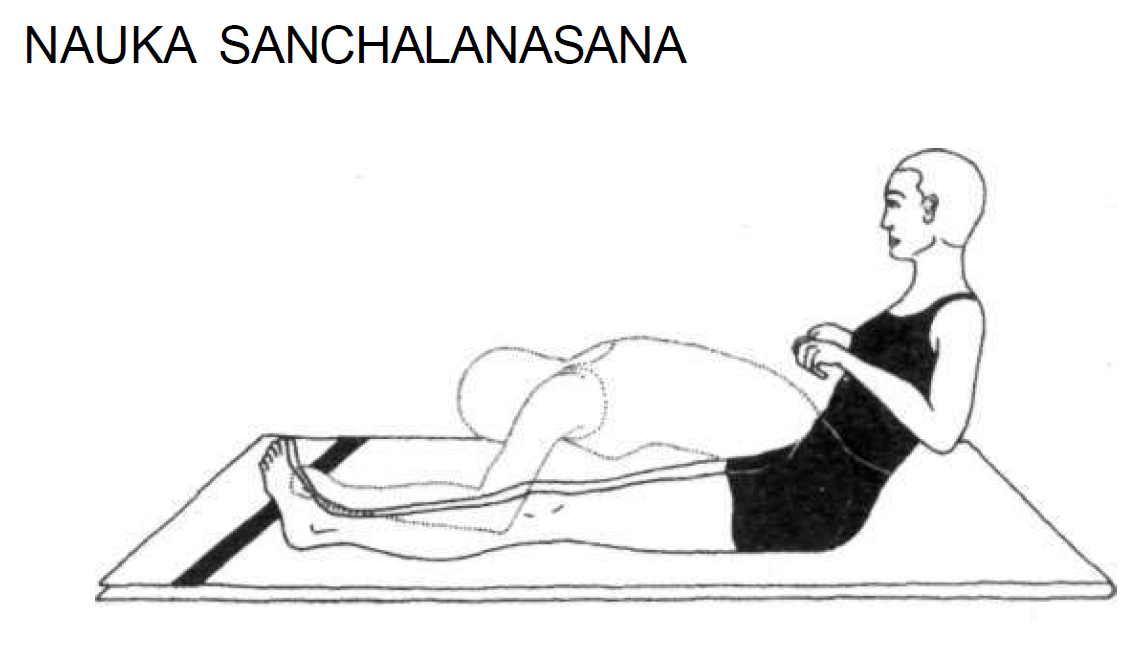
Rowing the Boat Nauka Sanchalanasana 4
Practice 4:
Nauka Sanchalanasana (rowing the boat)
Stage I:
Sit with both legs straight in front of the body.
Imagine the action of rowing a boat.
Clench the hands as though grasping oars, with the palms facing down.
Breathe out and bend forward from the waist as far as is comfortable, straightening the arms.
Breathing in, lean back as far as possible, drawing the hands back towards the shoulders.
This is one round.
The hands should make a complete circular movement in every round, moving up the sides of the legs and trunk.
The legs should be kept straight throughout.
Practice 5 to 10 rounds.
Reverse the direction of the rowing movement as though going in the opposite direction.Practice 5 to 10 times.
Stage 2:In the same sitting position, spread the legs so that the feet are about one metre apart.
The legs should remain straight throughout the practice.
Repeat the procedure as given in stage 1.
First row over the right leg, then the left leg and then over the space between the feet.
Breathing: Inhale while leaning back. Exhale while bending forward.
Awareness: On the breath, movement and lower back and pelvic area.
Benefits: This asana has a positive effect on the pelvis and abdomen and eliminates energy blockages in these areas.
It is especially useful for gynaecological disorders and postnatal recovery. It also removes constipation.

Chopping Wood Kashtha Takshanasana 5
Practice 5:
Kashtha Takshanasana (chopping wood)
Sit in the squatting position with the feet flat on the floor one and a half feet apart.
The knees should be fully bent and separated.
Clasp the fingers of both hands together and place them on the floor between the feet. Straighten the arms and keep them straight throughout the practice.
The elbows should be inside the knees.
The eyes should remain open.
Imagine the action of chopping wood. Raise the arms as high as possible above and behind the head, stretching the spine upward. Look up towards the hands.
Make a downward stroke with the arms, as if chopping wood. Expel the breath making a ‘Ha!’ sound to remove all the air from the lungs. The hands should return to the floor in between the feet and the head is facing forward.
This is one round.
Practice 5 to 10 rounds.
Breathing: Inhale while raising the arms.
Exhale while lowering the arms.Awareness: On the breath, movement and stretch of the shoulder and upper back muscles.
Benefits: This asana loosens up the pelvic girdle and tones the pelvic muscles. It is useful for women preparing for childbearing and may be practised during the first three months of pregnancy.
It also has a special effect on the usually inaccessible muscles of the back between the shoulder blades, as well as the shoulder joints and upper back muscles.
Practice note: Those people who find the squatting pose too difficult should practise in the standing position. The benefits, however, will be less.
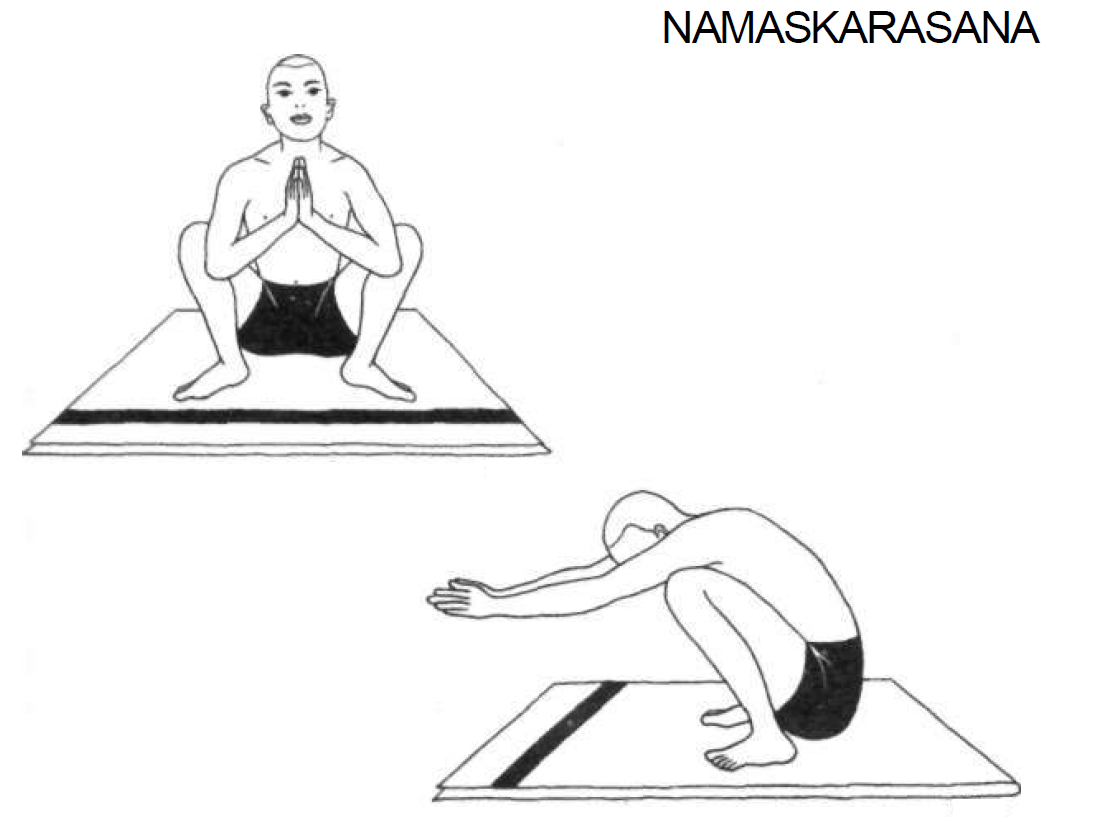
Salutation Pose Namaskarasana 6
Practice 6:
Namaskarasana (salutation pose)
Sit in the squatting position with the feet flat on the floor about two feet apart. The knees should be wide apart and the elbows placed against the inside of the knees.
Bring the hands together in front of the chest in a gesture of prayer.
Press the elbows against the insides of the knees.
The eyes may be open or closed.
Inhale and bend the head backwards.
Simultaneously, use the elbows to push the knees as wide apart as possible.
This is the starting position.
Feel the pressure at the back of the neck.
Hold this position for 3 seconds while retaining the breath.
Exhale and straighten the arms directly in front of the body.
At the same time, push in with the knees, pressing the upper arms inward.
The head should be bent forward with the chin pressed against the chest.
Tense the muscles of the upper back and shoulders as if someone is pulling the hands forward.
Hold this position, retaining the breath, for 3 seconds.
Return to the starting position and bring the palms together in front of the chest, bending the head back.
This is one round.
Practice 5 to 8 rounds.
Breathing: Inhale while bringing the palms together in front of the chest.
Exhale while extending the arms forward and retain.Awareness: On the breath, movement, stretch on the back of the neck and chest in the starting position, and the upper back and shoulder muscles in the forward position.
Benefits: This asana has a profound effect on the nerves and muscles of the thighs, knees, shoulders, arms and neck. It increases flexibility in the hips.
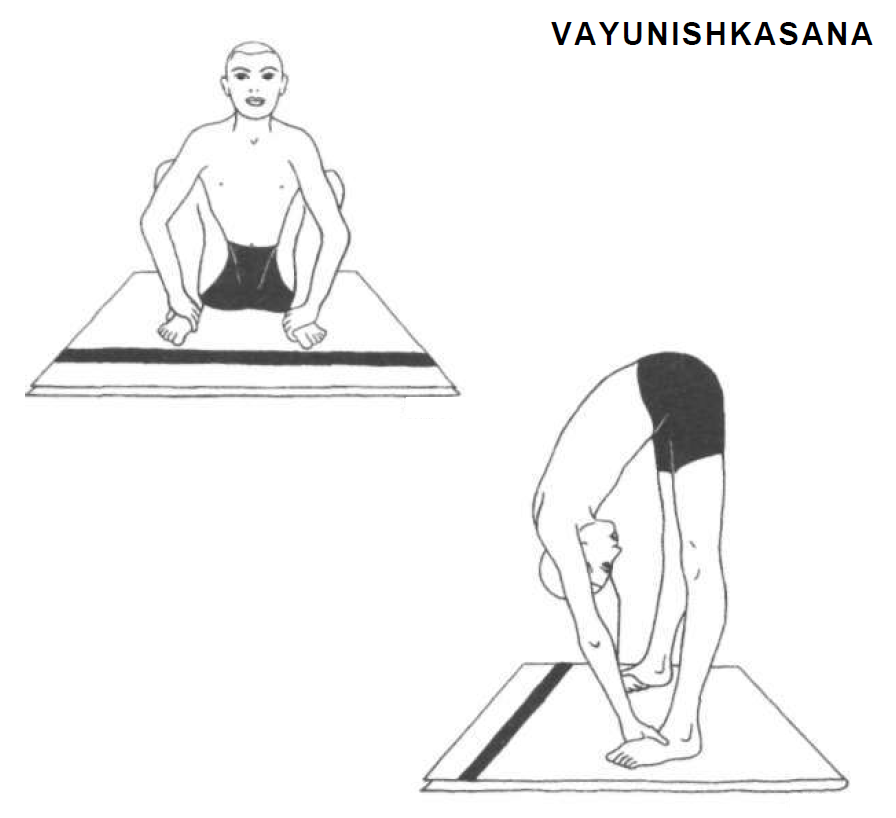
Wind Releasing Pose Vayu Nishkasana 7
Practice 7:
Vayu Nishkasana (wind releasing pose)
Sit in the squatting position with the feet two feet apart.
Grasp the insteps of the feet, placing the fingers under the soles with the thumbs above.
The upper arms should be pressing against the inside of the knees with the elbows slightly bent.
The eyes should be open throughout the practice.
Inhale while moving the head back. Direct the gaze upward.
This is the starting position.
Hold the breath for 3 seconds, accentuating the backward movement of the head.
While exhaling, straighten the knees, raise the buttocks and bring the head forward towards the knees.
Hold the breath for 3 seconds, accentuating the spinal bend. Do not strain.
Breathing in, return to the starting position.
This is one round.
Practice 5 to 8 rounds.
Breathing: Inhale in the squatting position and retain.
Exhale in the raised position and retain.Awareness: On the breath, movement, stretch of the neck in the starting position and the bend of the spine in the standing position.
Benefits:
Like namaskarasana, this pose has a beneficial effect on the nerves and muscles of the thighs, knees, shoulders, arms and neck. The pelvic organs and muscles are massaged.
It gives an equal stretch to the whole spine and both the arm and leg muscles. All the vertebrae and joints are pulled away from each other so that the pressure between them is balanced. Simultaneously, all the spinal nerves and dural sheaths are stretched and toned.
It is also useful for relieving flatulence.
Practice note: More advanced practitioners may place the
More advanced practitioners may place the fingers under the front of the feet. Shambhavi mudra may
also be practiced throughout. This will help to tone the entire nervous system.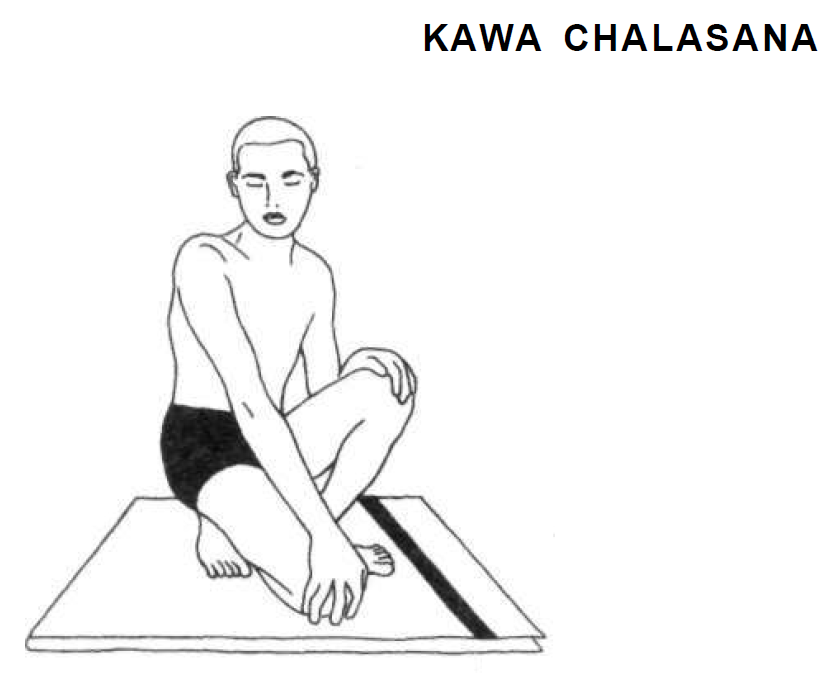
crow walking Kawa Chalasana 8
Practice 8:
Kawa Chalasana (crow walking)
Sit in the squatting position with the feet apart and the buttocks above the heels.
Place the palms of the hands on the knees.
Take small steps in the squatting position.
Try to keep the knees flexed so that the buttocks are not moved away from the heels. Walk either on the toes or the soles of the feet, whichever is most difficult.
As you take a step forward bring the opposite knee to the floor.
Take as many steps as possible, up to 50, and then relax in shavasana.
Breathing: Breathe normally throughout.
Awareness: While walking: on smoothness of movement.
While resting in shavasana: on the heart beat or breath and on the effects of the asana on the lower back, hips, knees and ankles.
Contra-indications: People suffering from disorders of the knees, ankles or toes should not practise this asana.
Benefits: This asana prepares the legs for meditation asanas and improves blood circulation in the legs. It also helps to remove constipation.
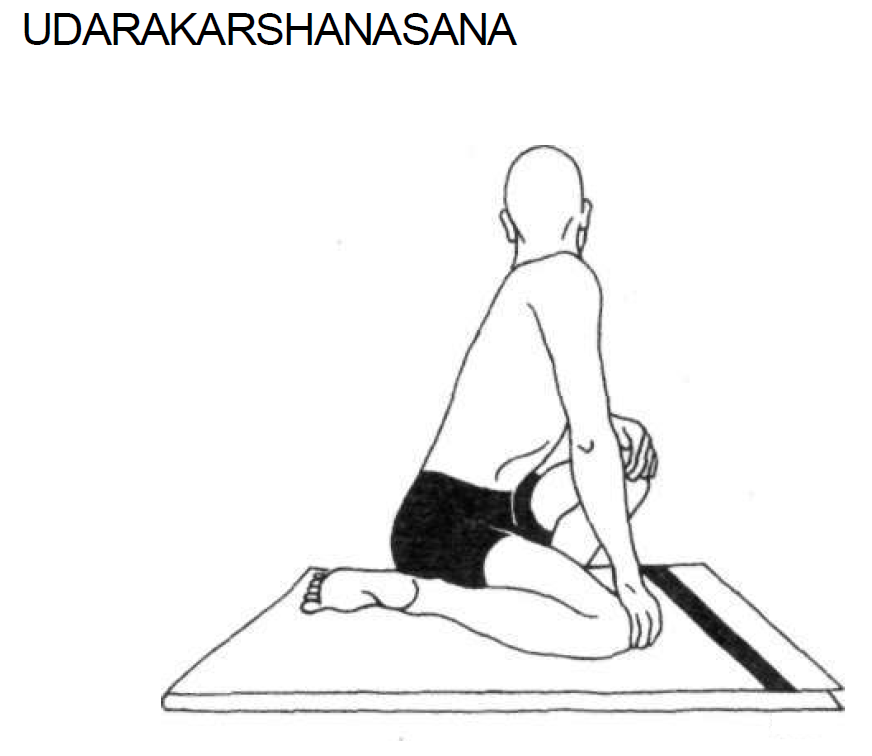
Abdominal Stretch Pose Udarakarshanasana 9
Practice 9:
Udarakarshanasana (abdominal stretch pose)
Sit in the squatting position with the feet apart and the hands on the knees.
Breathe in deeply.
Breathe out, bringing the right knee to the floor near the left foot.
Using the left hand as a lever, push the left knee towards the right, simultaneously twisting to the left.
Keep the inside of the right foot on the floor.
Try to squeeze the lower abdomen with the combined pressure of both thighs.
Look over the left shoulder.
Hold the breath out for 3 to 5 seconds in the final position.
Breathe in when returning to the starting position.
Repeat on the other side of the body to complete one round.
Practise 5 rounds.
Awareness: On the breath synchronised with the movement and the alternate stretch and compression of the lower abdomen.
Variation: Those who have difficulty balancing, may support their backs against a wall while squatting. The heels should be about 20 cm from the wall to allow for the twist.
Benefits:
This pose is very useful for abdominal ailments because it alternately compresses and stretches the organs and muscles of this region. It also relieves constipation.
Practice note:
This is one of the asanas practised in shankhaprakshalana. During this practice, the breathing may be
reversed to increase the pressure of the thigh against the abdomen. Take care not to over stretch the back as the body begins to feel lighter and more flexible.


SHAKTI BANDHA ASANAS
(ENERGY BLOCK POSTURES)
This group of asanas is concerned with improving the energy flow within the body and breaking down neuro-muscular knots, especially in the pelvic region where energy tends to stagnate.
The series is very useful for those with reduced vitality and a stiff back. It is especially useful for menstrual problems and toning the pelvic organs and muscles. It can be practised before and after pregnancy, facilitating the process of childbirth and retoning flaccid muscles. These asanas also eliminate
These asanas also eliminate energy blockages in the spine, activate the lungs and heart, and improve endocrine function.
The shakti bandha series may be started straight away if good health and fitness prevail, however, if there are any serious ailments, a therapist should be consulted.